
Understanding Metering Modes and Histograms

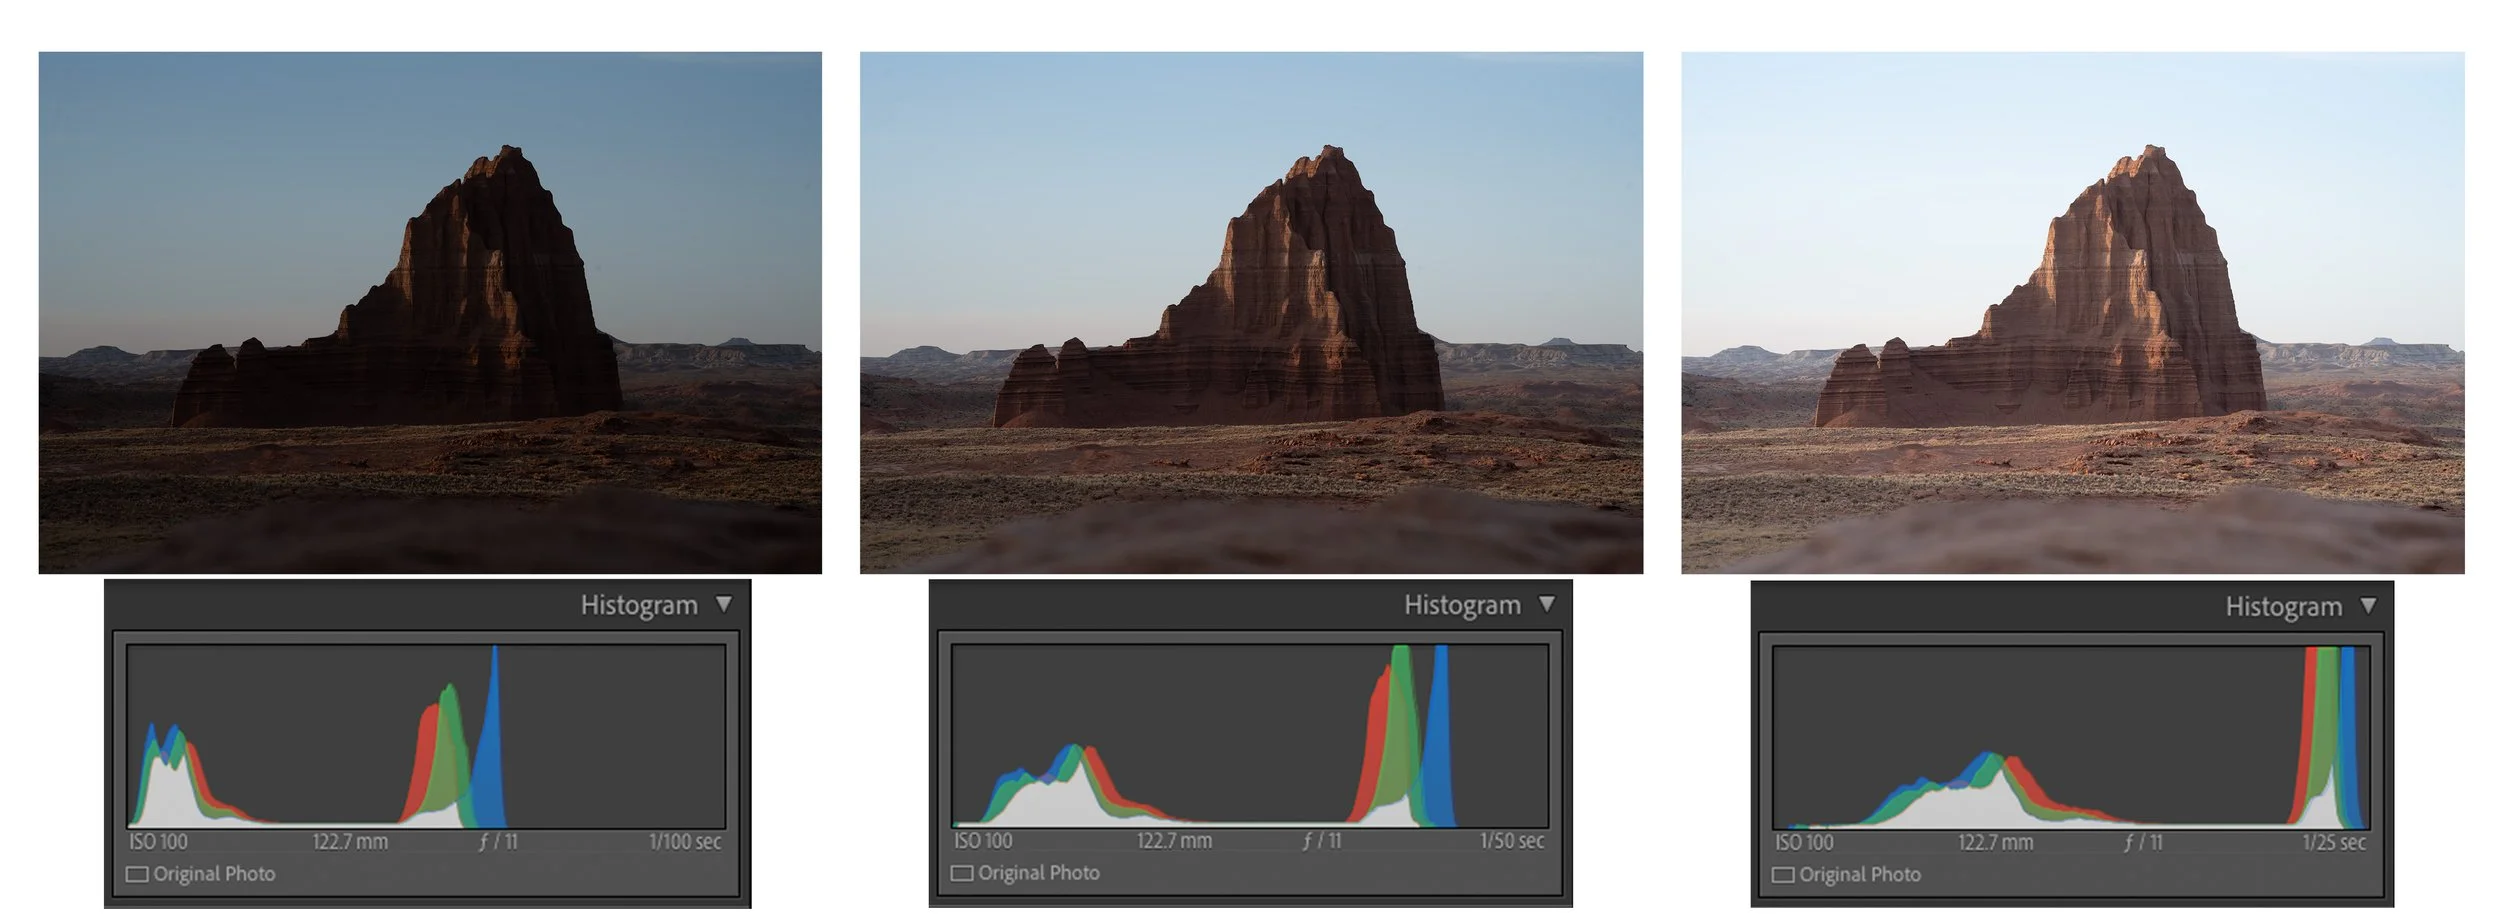
Temple of the Sun | Capital Reef National Park
In the world of landscape and astrophotography, mastering exposure is a critical skill that can significantly impact the quality of your images. Two essential tools in your camera’s arsenal are metering modes and histograms. These features play a vital role in determining how your camera measures light and how you interpret that data to achieve the perfect exposure, whether you're capturing a rugged desert landscape at sunrise or the ethereal glow of the Milky Way.
Before I started taking my photography seriously, I mostly relied on my camera’s automatic settings, letting it decide how much light to capture and where to prioritize exposure. But as I pushed my skills further, I realized that truly mastering exposure meant understanding the tools my camera offered, including metering modes and histograms. It’s one of those things that can seem a bit intimidating at first, but once you get the hang of it, it opens up a whole new level of creative control.
In this guide, we'll break down the different metering modes, explore the nuances of histograms, and share practical tips to help you make the most of these tools in the field. Whether you're a seasoned pro or just starting your photography journey, understanding these concepts can dramatically improve your results.
Why Metering Modes and Histograms Matter
What are Metering Modes?

Metering modes determine how your camera evaluates the light in a scene to set the correct exposure. Different modes prioritize different parts of the frame, and choosing the right one can make a significant difference in the final image. The main types include:
Matrix/Evaluative Metering: This is the most commonly used mode, where the camera evaluates the entire scene, factoring in both the subject and background to find a balanced exposure. It’s a great choice for landscapes, where you want an even exposure across the frame. However, it can struggle in high-contrast situations, like a sunlit canyon with deep shadows.
Center-Weighted Metering: This mode places more emphasis on the center of the frame, averaging the exposure based on the center area while still considering the background. It’s ideal for compositions where your main subject is centrally placed, like a lone tree in a field or a mountain peak against the sky.
Spot Metering: This is the most precise metering mode, measuring light from a small, defined area (typically 1-5% of the frame). It’s perfect for challenging lighting situations, like a brightly lit moon against a dark sky. However, it requires careful placement to avoid blown highlights or underexposed shadows.
Partial Metering: Similar to spot metering but covers a slightly larger area, often around 10-15% of the frame. This mode is less common but can be useful when you want more control without the extreme precision of spot metering.
What is a Histogram?
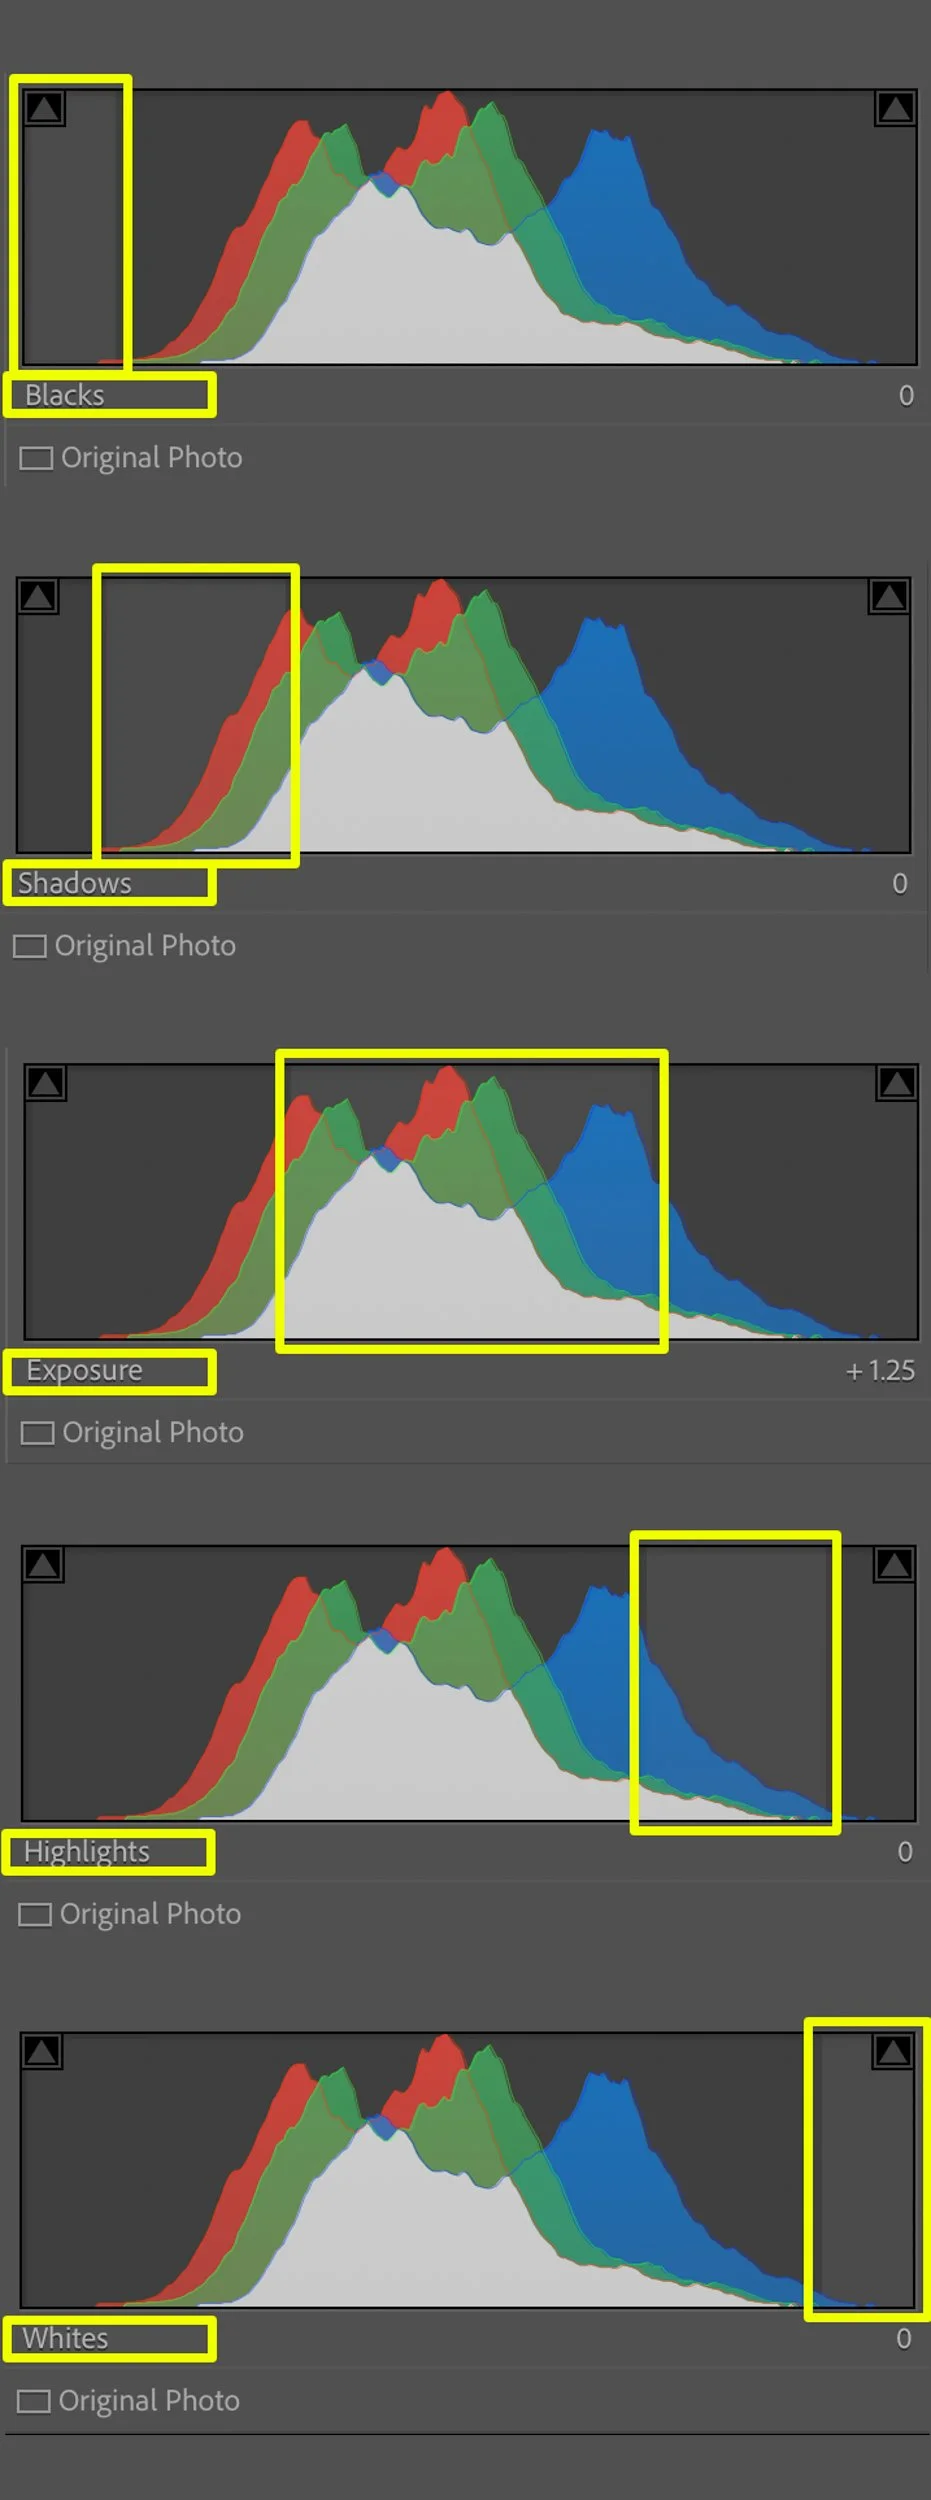
A histogram is essentially a graph that represents the distribution of tones in your image, from shadows to highlights. It’s one of the most powerful tools for assessing exposure, as it provides a visual representation of how light is distributed across the frame, regardless of what your camera’s screen might show.
The left side of the histogram represents the darkest parts of the image (shadows), the right side represents the brightest parts (highlights), and the middle area covers midtones. A well-balanced histogram will often show a smooth distribution, without spikes at either end that indicate clipping the loss of detail in shadows or highlights.
Reading the Histogram
Reading a histogram effectively is a critical skill for photographers. It allows you to gauge exposure quickly, even in challenging lighting conditions. Here’s a quick breakdown:
Left Side (Shadows): This section represents the darkest parts of your image. If your histogram is heavily skewed to the left, your image may be underexposed, losing detail in the shadows.
Middle (Midtones): This is where the bulk of your image data often sits, representing the average tones in your scene. An image with a lot of midtones, like a foggy morning or a forest in soft light, will have a strong central peak.
Right Side (Highlights): This part of the histogram captures the brightest areas. If this section is too high or pushed against the right edge, you risk overexposing your highlights, losing detail in bright clouds or reflective surfaces.
Exposing to the Right (ETTR) and Left (ETTL)
Understanding the concept of Exposing to the Right (ETTR) and Exposing to the Left (ETTL) can help you capture more dynamic images:
ETTR: This technique involves slightly overexposing your image to capture more detail in the shadows. It’s particularly useful in landscape photography, where recovering shadow detail in post-processing can add depth and texture to your shots. However, it requires careful monitoring to avoid clipping your highlights.
ETTL: In contrast, ETTL is often used in astrophotography or when shooting scenes with very dark elements. This approach intentionally underexposes the image to preserve detail in bright points like stars, reducing the risk of noise when boosting exposure later.
Practical Histogram Tips
Don’t chase a perfectly centered histogram, it’s more about balance and matching your histogram to the scene’s dynamic range.
Use your histogram alongside your camera’s highlight warnings (often called blinkies or zebra stripes) to avoid blown highlights.
Review your histogram regularly, especially in rapidly changing light conditions like sunrise or sunset.
For night photography, expect a histogram skewed more to the left that you would see in a day time or golden hour shot, this is normal and often desirable.
Still wrapping your head around histograms? If you’re looking for a more detailed breakdown, including how to interpret RGB and luminance histograms, check out my Comprehensive Guide to Image Histograms. It’s packed with practical examples to help you master this essential skill.
Choosing the Right Metering Mode
Matrix/Evaluative Metering
Matrix metering is the go-to choice for many photographers because it’s designed to handle a wide variety of scenes effectively. It uses data from the entire frame, often factoring in color, distance, and even your focus point to calculate exposure. This makes it excellent for balanced landscapes, where you want even exposure across the scene.
However, it can struggle when there are extreme contrasts in the scene, like a bright sky and a dark foreground. In these cases, your camera might overexpose the highlights or underexpose the shadows.
Center-Weighted Metering
Center-weighted metering is a bit old school but still highly effective in the right situations. It’s a great choice when your main subject is in the center of the frame, and you want the exposure to favor that area without ignoring the rest of the scene entirely.
Spot Metering
Spot metering is a powerful tool for high-contrast scenes, where precise control over exposure is critical. It’s often used in astrophotography to ensure the bright parts of the scene, like the moon or a foreground element lit by a headlamp, are exposed correctly. This mode requires more thought, as a small shift in your aim can dramatically change the exposure.
Partial Metering
Partial metering sits between center-weighted and spot metering, offering more control than matrix but less precision than spot. It’s useful for scenes where you want a bit more control but don’t need the extreme precision of spot metering.

Final Thoughts
Metering modes and histograms are critical tools for any serious landscape or astrophotographer. They’re not just technical settings they’re the language of light, helping you interpret the scenes you encounter and translate them into powerful images. Understanding how they work and when to use them can dramatically improve your results in the field.
Don’t be afraid to experiment with different modes, push your comfort zone, and make a few mistakes along the way, it’s all part of the learning process. Spend time really getting to know your histogram, not just as a technical tool, but as a guide for bringing your creative vision to life.
The next time you’re standing on a windswept ridge, waiting for the first light of dawn, or capturing the glow of the Milky Way in a remote desert, you’ll appreciate having this knowledge at your fingertips. Take a deep breath, slow down, and focus on the art of seeing, it’s one of the best ways to capture stunning, well-balanced images that truly reflect the way you see the world.
Ready to take your photography to the next level? Check out my Workshops for in-depth, hands-on training, or explore the rest of my blog for more photography tips and inspiration.
If you’re looking for more personalized guidance, consider joining one of my workshops or reaching out for a private lesson.
FAQ’s
What metering mode should I use for landscape photography?
Matrix (Evaluative) metering is generally recommended for landscapes, as it evaluates the entire scene to provide a balanced exposure. However, in high-contrast situations, such as a bright sky over a dark foreground, spot or center-weighted metering may offer better control.
How do I read a histogram, and what does it tell me?
A histogram displays the tonal distribution of an image: shadows on the left, midtones in the center, and highlights on the right. A well-exposed image typically has a histogram that spans the entire range without clipping at either end.
What is 'Exposing to the Right' (ETTR), and when should I use it?
ETTR involves slightly overexposing an image to capture more detail in the shadows, which can be beneficial for post-processing. It's particularly useful in low-light conditions but requires careful monitoring to avoid blown highlights.
Can I rely solely on the histogram for proper exposure?
While histograms are valuable tools, they should be used in conjunction with your camera's metering and your own judgment. They provide a graphical representation of exposure but don't account for creative intent or specific subject matter.
Is spot metering suitable for astrophotography?
Yes, spot metering can be effective in astrophotography, especially when focusing on bright objects like the moon. However, due to the complexity of night skies, many astrophotographers prefer manual exposure settings for greater control.
How does center-weighted metering differ from matrix metering?
Center-weighted metering emphasizes the central portion of the frame, making it useful when your subject is in the center. Matrix metering evaluates the entire scene and is better suited for evenly lit compositions.
What causes clipping in a histogram, and how can I prevent it?
Clipping occurs when parts of the image are overexposed (highlights) or underexposed (shadows), resulting in loss of detail. To prevent clipping, monitor your histogram and adjust exposure settings to keep the graph within the bounds.
Should I use different metering modes for different lighting conditions?
Absolutely. For example, spot metering is beneficial in high-contrast scenes, center-weighted metering works well for portraits, and matrix metering is suitable for evenly lit landscapes. Choosing the appropriate metering mode helps achieve optimal exposure.