
Night Sky Editing – The Basics
Editing night sky images is a joy, at least in my opinion! However, I still remember those days of being frustrated with the pictures that I was seeing on the back of the camera, comparing to photographs I was seeing professionals take, and not understanding how at all they did it! I remember finding editing programs like Lightroom and Photoshop daunting.
With that in mind I thought I could provide a complete run through of my basic editing process. Following this post, you’ll be able to copy the process to give editing of your nighttime images a go. This post will give you an idea of what to aim for and how to get there, revealing some of the mystery behind how beautiful images are made.
If you’ve never edited night-sky images before this is a good place to start, and hopefully gain a greater understanding of the tools and tricks you can use to enhance your night sky image.
Although this piece may seem long and technical, I can assure you that by taking the time to understand how the basic tools in Adobe Lightroom work you will vastly improve the quality of your images. Furthermore, by learning and following the processes of others, you will be able to learn what you both like and dislike and begin to craft your own personal style and taste.
Therefore, whilst reading this guide I urge you to have your Lightroom window open alongside and a picture ready to practice editing.
With that, let’s dive in!
1 - Lens Corrections
I typically run through my panels from top to bottom, this is the only exception!
So the first thing to do is to enable your lens profile corrections and select the model and profile of your lens.
This means that Lightroom will automatically adjust any systematic vignette and distortion that occurs with a specific lens. It’s not perfect but it’s a start!
It’s not perfect but it’s a start!

2 - Basic Panel / White

Navigate to your “Basic” panel.
Increase your Vibrance and Saturation to 100. This is going to look strange, but helps us for the next step.
Adjust your “Temp” and “Tint” so that the oversaturated colors you are seeing are more balanced. You don’t want to be overtaking your image. It should look similar to the image below on the left (WB 02)
Decrease your Vibrance and Saturation back to 0.
This will produce a very flat looking image, which is what you want at this point. See the image below on the right.


3 – Basic Panel / Tone and Presence
Exposure: This controls the brightness of your image, too bright or too dark as we’ve already seen, makes the image useless. This is a matter of taste however, in this image I adjusted to + 0.20. Be warned however the brightness will also change as you adjust the other settings, so you may have to come back and adjust again.
Contrast: Increase this to your liking as well. In this image I used a contrast adjustment of +20.
Highlights: Adjusting the highlights changes the brightness of certain parts of the image, watch the histogram feature at the top of the panel to see how it moves. This will help to understand the adjustment being made in the image. Reducing highlights is helpful for reducing light pollution, however going too far will create a halo effect around certain objects. For night sky images I usually stay within a range of -5 and -40.
Shadows: Push this sucker up! Now the more you add, the more noise you’re going to introduce into your image. I usually fall between 20 and 40, which is where I stopped on this one. Again, watch the histogram to spot some of the changes being made.
Whites & Blacks: Only subtle changes needed here, usually pushing the white up and the blacks down just a little.
Clarity: Minor increase, if any at all. This slide it is easy to lose control and go to extremes.
Dehaze: For me this one is all about personal taste. I don’t touch it at all!
Vibrance: Push this guy up, I usually end up around 20-30.
Saturation: Push this one up a little too, usually around 10-15 as a max. This is another one that you can lose control with quickly.

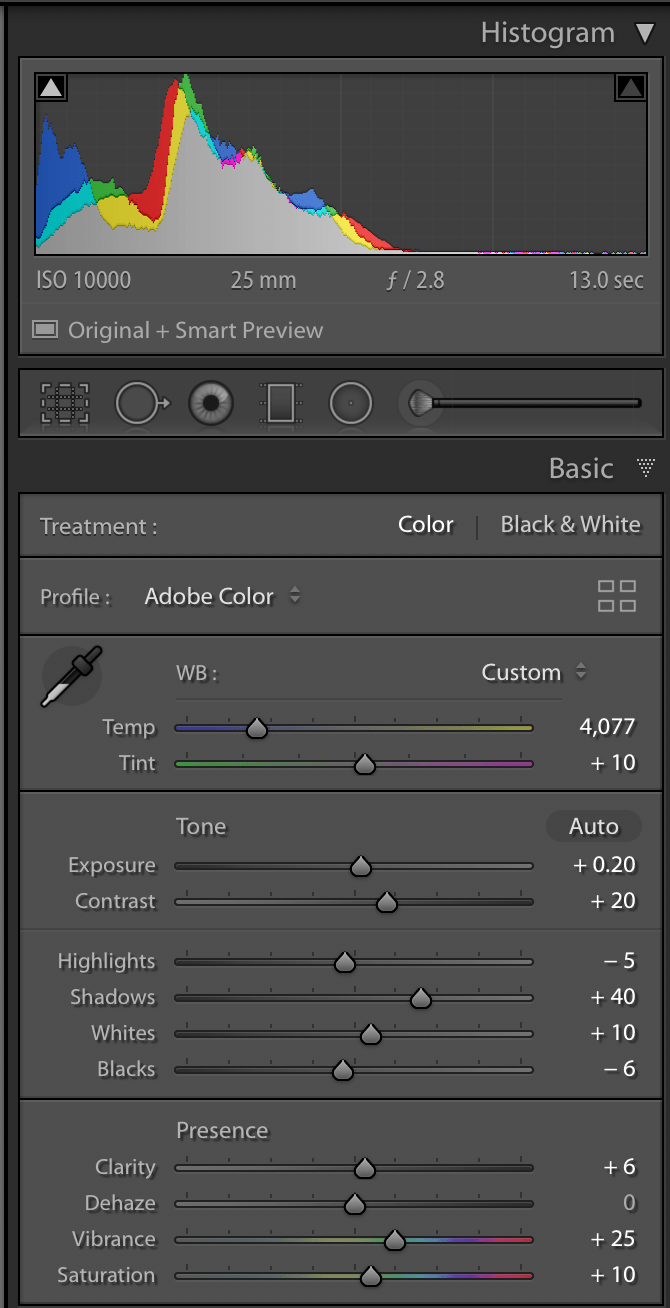
Now you have used all of the adjustment tools available in the basic’s menu. You should have a relatively balanced looking image, dark enough to show that it was taken at night, but as much detail as possible in the foreground.
Another thing to look out for is over saturation, your colors should look natural and not excessive, as in the image to the right above. Finally, this is the moment I normally choose to back and make a final adjustment to the temperature and tint. These are subtle adjustments, but you can hopefully see the difference with the images side by side.
Final settings for polished white balance and exposure
Here are the final settings for the finished image which can be seen in the image below (WB04). You can see the level of adjustment that is available with the sliders, and that generally I never increase the adjustments over halfway in any direction. When editing photos, it serves well to remember that a little adjustment can go a long way.

4 – Detail Panel / Sharpening and Noise Reduction
Again this is an area where I do basic edits, while Lightroom recently has become much better at noise Reduction and Sharpening I do most of that in Photoshop. This will provide you with a great foundation. Feel free to push the sliders a little more than I typically would if your workflow stops in Lightroom.
Sharpening:
Radius – Lower all the way to 0.5
Detail – Increase this one to 100
Masking – Start with holding down your alt/option key, this will show you the selected area. Adjust your masking so that only your stars and horizon are selected (white).
Amount – Adjust this to taste. I usually run between 30 and 60, for this image I landed on 55.
Noise Reduction:
Luminance – Increase this one, I usually settle around 15.
Detail – Increase again, I usually land around 65.

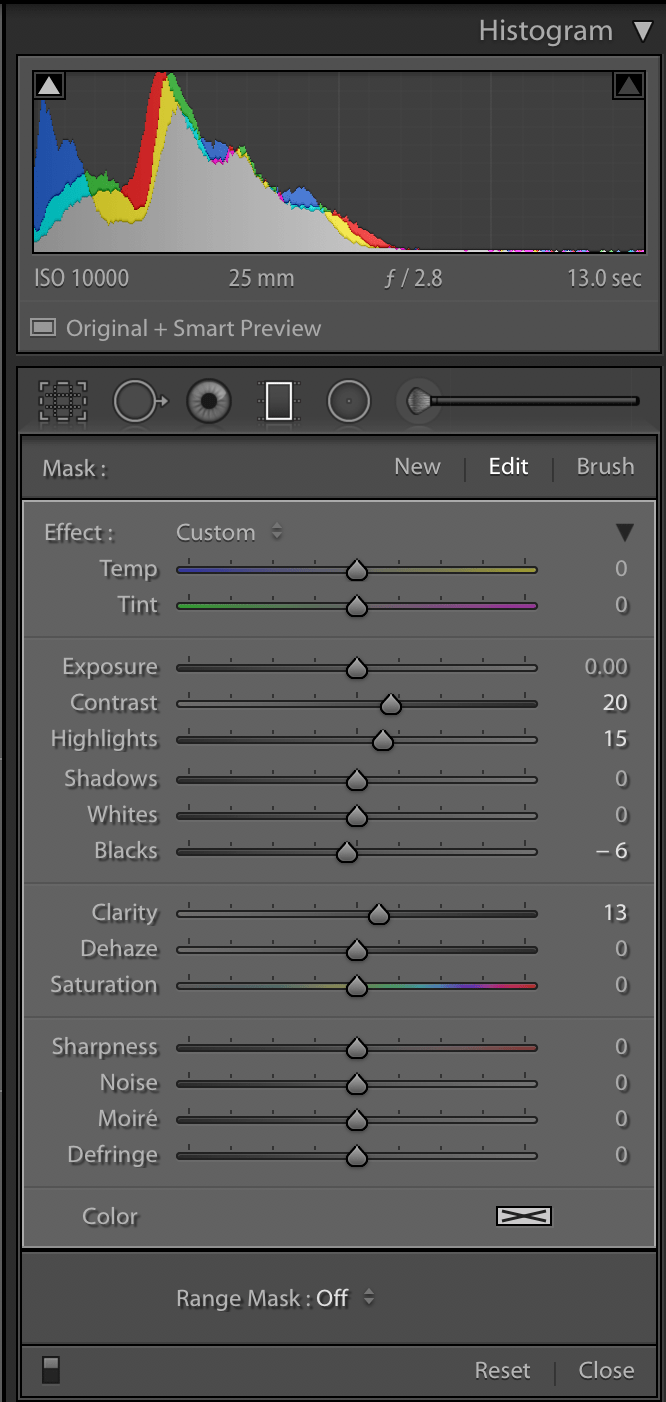
5 – Final Touches / Local Adjustments
These final touches use localized adjustments with graduated filters and brushes to only adjust some of the image. These tools allow you to really dig into the details and make things stand out.
Graduated Filter: Here you can add a graduated filter coming down from the top to cover your sky. Highlight the sky whilst slightly overlapping your foreground just a little bit in order to blend the adjustments together in a balanced way.
Contrast: Kick that up just a little, this image went to 20.
Highlights: Bring that up a little as well, this came up to 15.
Blacks: Bring that down just a little, this one stopped at -6.
Clarity: Kick that up as well, this one stopped at 13.
At this point use your brush tool to adjust the mask and remove any of the graduated filter from the foreground.

Brush Tool: Here you can really work on making the core of your milky way shine. A word of caution go easy on your adjustments, even more so that you did above. Think of this brush tool as a paint brush, you want to gently apply your adjustments. You can go over areas multiple times continuing to apply your adjustments where you want the effects to be stronger.
Highlights: 20
Shadows: -10
Blacks: -10
Clarity: 5
Saturation: 2
Feather: 100
Flow: 20 This may need to be lower depending on how far you adjusted the sliders above
Auto Mask: Checked
Brush this over your Milky Way until you have the pop you want!


6 – Final Considerations
Vignette: The tool that can be found in the details section and should be used very lightly. Check it out and see what you think, adding a vignette darkens the edges of the image which can help to highlight bright colors in the center.
Tone Curve: I tend to skip this panel, although it can be useful. The adjustments made above usually provide a nice contrast balance in the image. At the very most I will add a slight S curve, raising the bights and lowering the darks. This can be done manually or by starting with “Point Curve” of Medium Contrast.
Transformation Panel: This particular image doesn’t need any adjustment but depending on your image and the distortion it creates you may need to straighten your image here. You don’t need any funky saguaro’s pointing off in weird directions. When I do use this panel, I’m usually using the Guided method.
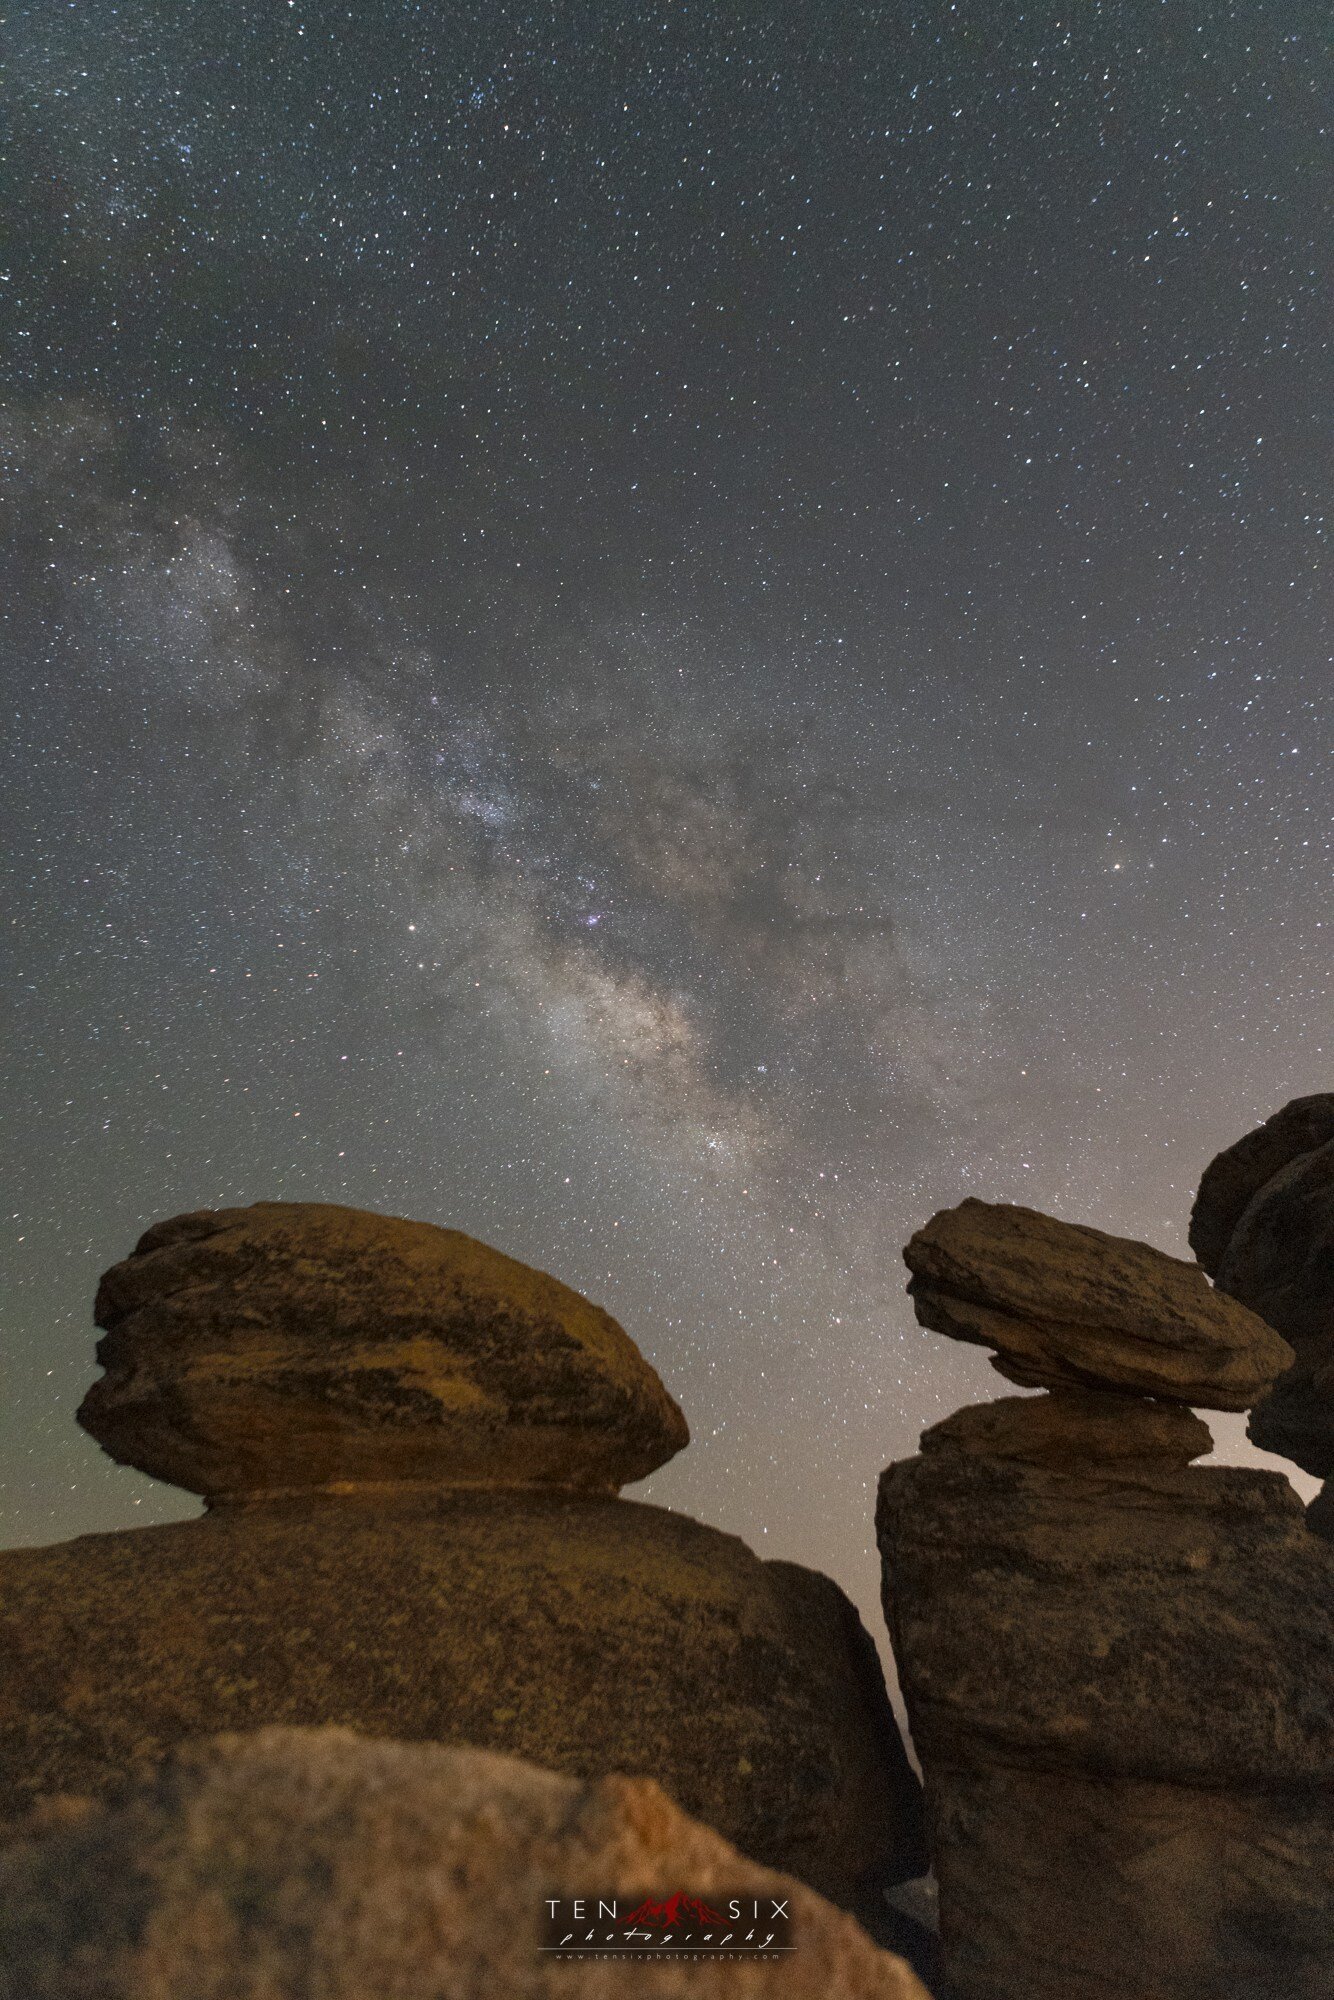
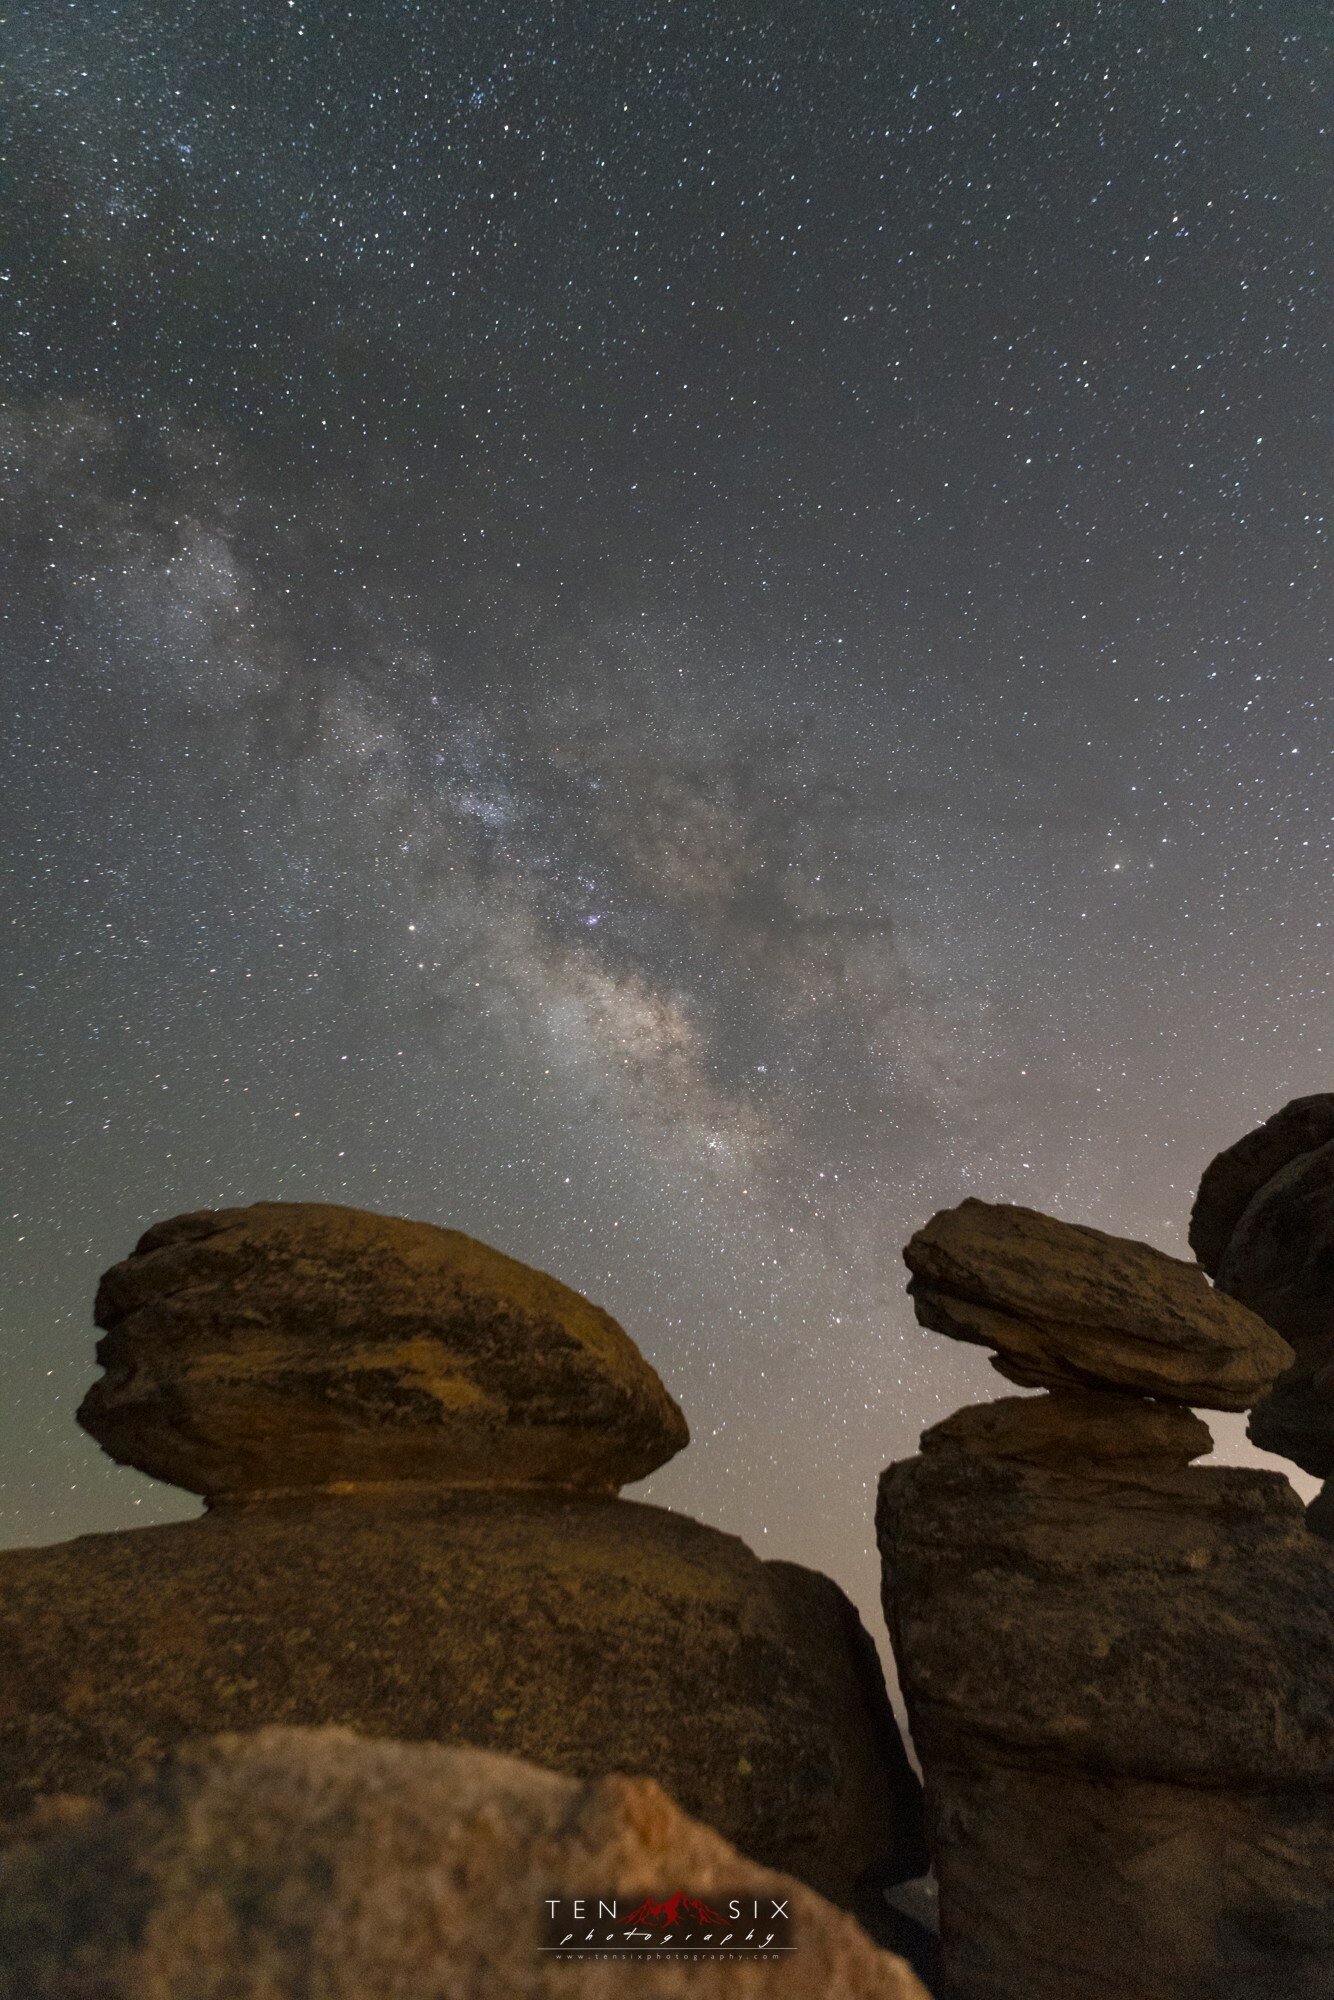
The Before and After
Remember all of the settings above build upon each other to get you where you want your final image to be!
So that’s a wrap …
That’s a complete run down of my foundational edits and how I get my night sky images off the ground. Obviously not all images are the same and this is not a direct guide, but it should give you some idea on where to start, and what Lightroom and the various tools within it can do.
Let me know what basic edits you like to do to your images and share them down below. Or better yet, if you feel like you want more hands-on face to face advice on how to make the most of your images, book onto one of my workshop courses, where we can spend a couple of days getting to grips with both shooting and editing!
Learn more about my in field and post processing workshops and book them here:
https://www.tensixphotography.com/astrophotography-and-nightscape-workshops